Have a question? Enter a search term. Or give us a call at 1-888-518-0818

Our Basic Text Messaging functionality is for contacting your employees and your customers. Basic Text Messaging is used for OUTBOUND texts only. If the recipient attempts to reply to a text message, it will return: “This phone number is for outbound messages only and is not monitored. Please do not reply to messages from this number.” Due to this, it is advised that you indicate this in your text message templates.
You can also view a video tutorial about our Basic Text Messaging Features.
In order to text your employees from Smart Service Cloud you must have the employee's cell phone number on file. Go to the employee's profile and enter their cell phone number in the “Mobile” field.
Once this has been completed, you will have the following options available to communicate with your employees.
Send Text Message is an option that is found on the Dispatch Board of Smart Service Cloud. Simply right-click on the employee on the left side of the schedule, and select “Send Text Message”. Use this option for general communication.
As an additional note, you can also include an app link to Smart Service Cloud for your company to the technician as well as their login ID, if this is their first attempt at logging in.

Dispatch Now allows an office user to immediately send details to a technician in the field about a new scheduled service. From The Dispatch Board, right-click on an appointment and select "Dispatch NOW".
This text message will include a link to the appointment that was scheduled for the technician, which they can simply open from their mobile device for quick access.

Text messaging customers comes in the form of notifications that can be configured in "System Settings". Go to the Administration Center and select System Settings. Click on "edit" at the bottom of the window and scroll down to the Text Messaging section.
You can click on the toggle switch to activate, or deactivate each notification. Each type of notification can have a customized message.
You will see that some of the text is in {brackets}. We call these Merge Fields which are placeholders that automatically populate information from specific records so you can send text messages without having to personalize each one individually. Using Merge Fields is optional.
Again, if you believe a customer may try to reply to the text message, this is the space to indicate to them that this is an outgoing message only.
Click on the link below to learn more about Merge Fields.
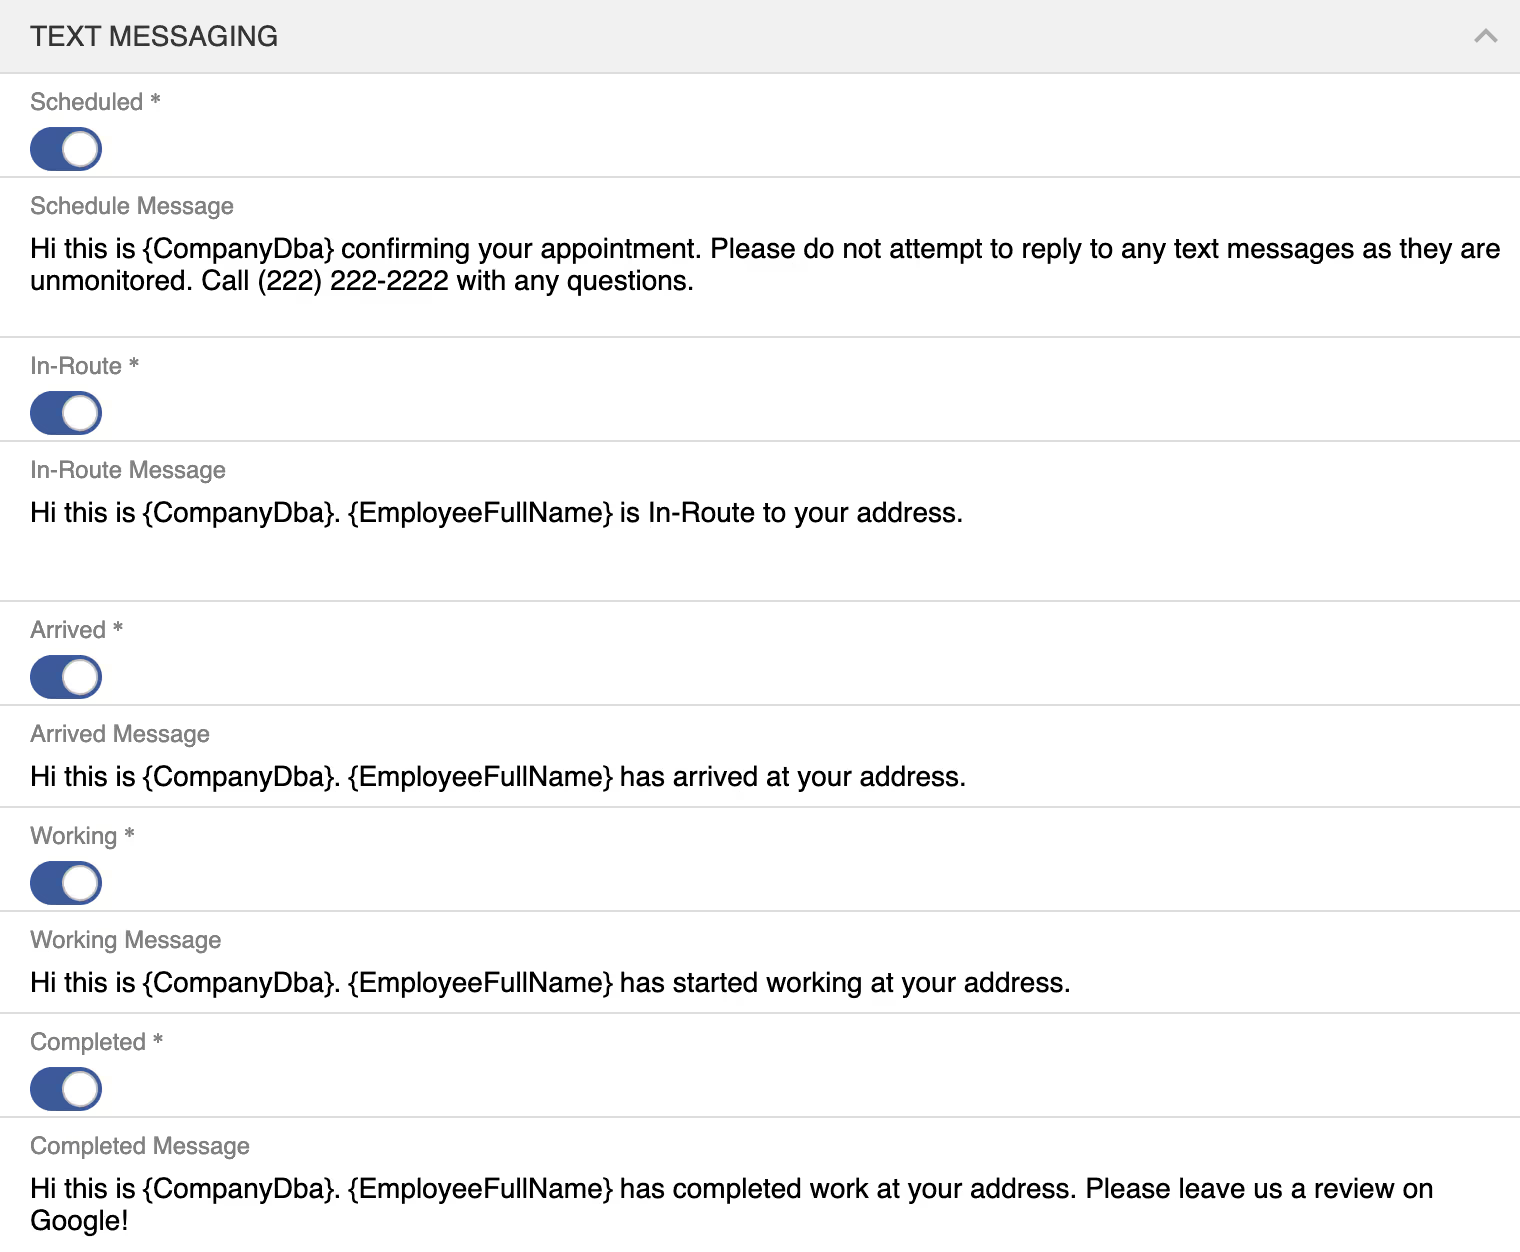
In order for one of these text messages to be sent to a customer, your technician must change the statuses at the top of their scheduled event. In the example below, the technician changed her status from "Scheduled" to "In-Route". Each status change will initiate the appropriate notification to be sent to the customers' mobile phone number on file.

Our Advanced Text Messaging features allow for two-way communications with both employees and customers. You can create templates that will save you time when sending both individual text messages, and text messages in bulk. Also, you can create Auto-Responder text messages that are automatically sent when a customer responds with a specific keyword, or during specific days and times.
You can use these advanced features for just about every aspect of your business such as confirming appointments and marketing. In this article, we will learn about how these new features work, however, you should view the video tutorial below to see some more examples of how these features can be used.
Smart Service Cloud has partnered with Twilio to bring you these exciting features. Twilio provides the phone numbers that you will be texting from. Go to twillio.com, then select "Products". Then select SMS. Just so you know, SMS is another name for text messaging.

When you are setting up your Twilio account, you will want to determine how many texting phone numbers your business needs. You might need two separate lines - one for sales and one for service, for example. (We we be using this example throughout this article.)
You will be provided with a Twilio Account SID and a Twilio Authorization Token along with your new texting phone number(s).
Go to The Administration Center and click on System Settings. Hit edit at the bottom of the window. Scroll down to integrations. Enter the Account SID and Autorization Toked that Twilio has provided you.

Now you can add your new texting phone numbers to Smart Service Cloud. Go back to the Administration Center and scroll down to Twilio Phone Numbers. On the bottom right of your screen, click on the plus symbol. Give each phone number a description, then enter the phone number.

You will need to determine who in your organization will be taking on the role of text messaging communications. You can designate this role to multiple employees.
Go to the human resources center, which you can find at the top, or bottom of your screen. Select Employees from the list. Then click on the employee profiles of those who will be taking on this role. Click “edit" at the bottom of your screen.
Then find the Security and Roles tab near the top of your screen. Check the Text Messaging box. Then save it.
These employees will now have access to the Text Messaging Center that they can find at the top or bottom of their screen.

We will explore The Text Messaging Center shortly. First, you will need to create some text messaging templates that you will be using frequently. Go to the Administration Center at the top or bottom of your screen. Scroll down to SMS Message Templates. Click on the "plus symbol" at the bottom-right of the screen to create a new one.

In this example, we created a "Confirm Appointment" template. The Message Description field is the name of the template and will not be seen by the customer.
Notice that it says "reply with confirm" in the message body. We will discuss that shortly. You could also use Merge Fields in this section to add a personal touch to the templates.
The Phone Description field allows you to choose which phone number you would like to send this template from. You can add a website in the Optional URL field, and add a link to The Customer Portal.
A vCard is basically a business card that allows your customer to easily add all of your contact information to their mobile phone’s contact list. There is a button below that contains a pdf document that you can copy the text from and edit the information.
Also, you can add up to three images to each template.

When you send this text message to your customers, it will look much like this. Again, we asked the customer to "reply with confirm".
So, let's set up an Auto Responder Message that will automatically send once the customer replies with 'confirm'.
We will create an Auto Responder Message that reads, "You're all set! Please call 888-888-8888 if anything changes."

Auto Responder Messages are text messages that automatically get sent when you receive a specific keyword. In the above example the keyword is 'confirm'. To create an auto-response, go to The Administration Center and scroll down to SMS Auto Responder Messages.
This is where you will manage all of your Auto Responder Messages. Click on the plus symbol to create a new one.

At the top of the window, you will have options to include a vCard or images to the auto-responder message.
In the Carrier Numbers field, you can choose which phone number you would use this auto-responder message with. You can always choose one, both, or all depending on how many phone numbers you set up.


In the Type field, you can select from many different options that will give you flexibility based on your unique needs. We will cover those options momentarily.
In this example, "Custom Text" was chosen so that an auto-responder message will automatically be sent to a customer when you receive a specific keyword.
Then enter the keyword, which in this case is "confirm." In the Message field, write your auto-response to the keyword 'confirm'. Be sure to save it when you are done.

When the customer repiles with "confirm" the auto-response will automatically be sent.
Here are all of the Type options that you can select from the Type field. Click on each one to learn more about them so that you can start using them for your unique needs.
Now that we have created some templates and auto-responses, let’s learn how to manage your text message conversations. At the top or bottom of your screen, click on the Text Messaging Center.

You will see a list of your text messaging conversations. Each conversation is labeled with the phone number that the text message originally came from.
Each conversation has a time stamp of when the latest text message was sent or received.
The color on the left of each conversation indicates the status. Red indicates that this conversation hasn’t been engaged with yet
Blue indicates that someone in your organization has claimed the conversation and that they are working on it.
Green indicates that the conversation has been resolved.
The number on the right shows how many un-reviewed messages are in each conversation.
You can use the calendar to search for specific conversations.
Review the details of a conversation by clicking on it.
Once you open a conversation, yuo will notice that, by default, the history of each conversation starts from the bottom-up. You can change this by clicking on the Date/Time column header on the right.


Messages with a red label next to it indicate that the message hasn’t been reviewed yet. The direction arrows indicate whether each text message is inbound or outbound.
Here we see the customer started the conversation with "Hello". This triggered an auto-response. All auto-responses are highlighted in gold.
The customer replied with "emergency", which triggered another auto-response.
A yellow direction arrow indicates that there is an attachment in the text message such as a pic or video.

Click on a message to review it. You will have the option to edit the message or view any attachments if applicable.
By clicking on edit, you can change the reviewed status. Also, you can create a new customer or tie this conversation to existing documentation.

You can view any attachments.

Near the top of the screen, you will see options for Claim, Whisper, and Resolved.
To claim this conversation, click on "Claim". A claimed message will appear, highlighted in blue. This will let others in your organization know that you are working with this customer. Also, it will indicate who claimed it.

Whisper allows others to add a message to the conversation by clicking on Whisper. Customers will not have visibility to Whisper messages.

Whisper messages are highlighted in orange. Also, the name of the messenger will be shown. You can respond to the customer by clicking on + NEW MESSAGE.

You can write an original message, or select a template. Also, you can select a template and edit it to your liking.

Once the conversation is complete you can click on Resolved. Resolved messages are highlighted in green.

If the phone number from which the customer has sent a text message is already associated with a customer profile, these text conversations will be automatically tied to that customer. When you are looking at a customer's profile, you will see a “Text Messages” tab. Every text conversation that you have with this customer will appear here
If a new customer sends a text message, once their information, including their mobile phone number, has been recorded in Smart Service Cloud, these text conversations will also be automatically tied to that customer.

In this example, we will send a "Confirm Your Appointment" text message from a template to customers who have an appointment scheduled for tomorrow.
From the Appointments Center click on the "Start Date Time” column header. Select “Date filters” and select Tomorrow. Then, select all of the appointments. On the left of your screen, click on “Send Text Message”. Choose the phone number that you want to send from. Then select the “Ask Customer to Confirm” template. You can always edit the message if need be.

Once a customer replies with "Confirm", you will see "Confirmed Via SMS" in the Pre-Notification column within the Appointments Center.

Go to the Human Resources Center, and scroll down to Employees. Select any employees that you would like to communicate with. Then click on "Send Text Message" on the left of your screen. Choose the phone number that you want to send from. You can select a template or write an original message.
